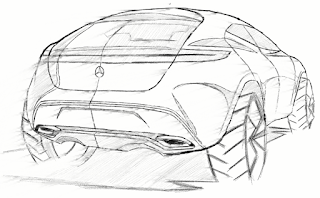
HOW TO DRAW MERCEDES G-CODE SUV
How to Draw Mercedes G-code: step by step tutorial.
Learn how to make
1. STEP ONE:
Here we start giving rise to a offroad Mercedes by beginning with very unusual two not so good looking boxes,this will help us to place our Mercedes at the right direction and position.
Draw a rectangular (rough)box as shown in the figure to start with the back body and then draw a mini square(roughly).Make sure that the square is attached to the rectangular bar.
2. STEP TWO:
This step will clear all your doubts regarding to the finished sketch and the first step in which we drawed some non sense boxes:p.Draw three wheel .The western most wheel will be round and clear where the other two will be looking as the car is moving forward as shown in the figure above.
3. STEP THREE:
Now the magic starts.Start making oval roungs and curves to the drawn figure as shown in the figure.Start with the tyre by making and semi oval in such a way that it looks like the car is moving forward.Make the base as to add two silencers at the bottom.
4. STEP FOUR:
Take the eraser in the hand.Start erasing the boxed and uncurvered area.After doing so make the back window as shown in the figure. Make the front window too.This all will be about giving the basic structure of our Mercedes.
5. STEP FIVE:
Making the basic back part of the car,tine for detailing!!.Start making the exhausters and give the two semi circle which we made to place silencers a clean look and a upper outline as shown in the figure.Draw a part where the number plate would be placed as shown in the figure.joining the two exhausters with two nearly crossing lines to.it look realistic.6. STEP SIX:
Outlining time:Outline all the main parts drawn till now and make some adjoining lines from ends of the window and the back parts. Draq a shield protecting our window as shown in the figure. Draw a quadrillion figure in the souther part of the door side.Shade our exhausters dark to make them look good and clean .
7. STEP SEVEN:
Tyres:The most focused part of our Mercedes is the tyre as they are not at all equal to each other. Make ovals (not so perfect)and then make one more by its side and add forks as shown in the figure
*Do same for all the tyres(3 tyres).
8. STEP EIGHT:
This steo will be about detailing all the drawn part and not adding a new one .Make backlights ,the well known Mercedes symbol ,doors and roof part.The door part will be mostly about separating the front and the back portion of the car.Draw the symbol right below the shield as classified in the step 7.Give some required detailing to the backlights and the tyre portion.
9. STEP NINE:
Till now,we have completed our car part but still some shading is remaining.Do refer the diagram and complete the shading part as it can not be discussed by verbal explanation. Going further,check the below portion of the car.Here you will see some shades about ground area which should be giving special attention to Make our car look more realistic.
10 .STEP TEN:
Highlighting all the major drawn parts to add some final touches.Please do not overshade.Make some required detailing on the window part as shown in the figure above.Shade all the parts like shield of backwindow ,headlights ,tyres,etc.


It is awsome
ReplyDelete